An introductory guide to Continuous Integration and Delivery/Deployment (CI/CD) for Frontend Developers

I'm a software engineer and technical content writer. My passion is to communicate complex technical information in a clear and understandable way to others. I enjoy crafting efficient, maintainable, and scalable code, and creating content that informs and educates my audience. I take pride in continuously improving my skills and keeping up with industry trends to deliver the best results possible.
Introduction
Software engineers are expected to follow the best practices in building software that's reliable and easy to maintain and several challenges arise that prevent development teams from releasing rapidly such as:
Manual deployment process
Lack of automated testing
Code Integration
With the help of Continuous Integration and Delivery/Deployment (CI/CD), these problems are solved easily with automation. In this article, I'll explain what CI/CD is, the benefits and how you can put it into practice as a Frontend Developer.
What is Continuous Integration and Delivery/Deployment (CI/CD)?
Continuous Integration and Delivery/Deployment (CI/CD) is a combined practice in DevOps that ensures high-quality software is delivered timely to the end-users of the software we build.
Let's break the terms down and explain them separately.
Continuous Integration refers to the practice where developers merge their code to a shared repository regularly (several times a day or multiple times a week) and automated tests and checks validate it to ensure code quality. When this is set up developers can work on releasing new features rapidly and catch bugs before our users 🙃.
Continuous Delivery comes next after CI is set up in a project. The main purpose of continuous delivery is to automate the process of releasing the new production-ready code that has been validated by CI. It is very important for a CI pipeline to be in place to ensure code that's free from bugs is delivered for deployment.
Continuous Deployment is the next step after continuous delivery and the final step of the CI/CD pipeline or process, it automates the release of an application to production. Continuous Deployment is an extension of continuous delivery and both terms are sometimes used interchangeably.
This is what a typical CI/CD workflow looks like:

What are the benefits of CI/CD?
The benefits of CI/CD outweigh the cost of setting it up in a project and some of those benefits include
Reduces friction in the development cycle as manual processes such as testing and deployment are automated.
Encourages development best practices such as testing and code review to ensure the code is high quality and bugs are caught early.
Developers can ship product releases faster because they are constantly integrating changes made with other developers and the CI pipeline validates the merged codes for bugs and code quality.
What are the tools used for CI/CD?
There are several tools available for CI/CD today, some of them include
In this article, we'll make use of GitHub Actions because of its ease of use and integration with GitHub.
Prerequisites
In this article, I'll walk you through how to set up a CI/CD pipeline for a frontend application. Here are some of the things you'll need.
Getting started
We've discussed what CI/CD is and the benefits that come with practicing it, let's see how we can implement it with a real application. I've set up a demo project in React with a couple of tests that we can work with it. Here's the repo link
Let's dive in 👨💻
The first step in setting up a CI/CD pipeline is having continuous integration set up. At the start of this article, we talked about what continuous integration is, now let's highlight some key areas in frontend development you'll find in a CI workflow
Linting and Formatting
Unit and Integration Tests
End to End Tests
Accessibility Tests
A good example of how this works is in a project with several developers and one developer is done working on a particular feature and wants to integrate the changes into the central repository, an event is triggered in this case it can be a push to a branch in the repository or a pull request and the CI workflow for that event is executed and if all the necessary checks pass the changes can be merged into the central repository.
Once continuous integration is set up we'll discuss how to make a continuous deployment workflow for deploying our application to Netlify.
Project setup
First, fork the repository and clone it into your machine.
Next step switch to the start branch and install the dependencies
git checkout start
yarn install
After the installation, start the application and navigate to http://localhost:3000
yarn start
You should see something like this
Let's talk about GitHub Actions before we proceed to create our CI workflow.
What is GitHub Actions?
Here's an excellent definition of GitHub Actions from their documentation
GitHub Actions is a continuous integration and continuous delivery (CI/CD) platform that allows you to automate your build, test, and deployment pipeline. You can create workflows that build and test every pull request to your repository or deploy merged pull requests to production.
With GitHub Actions, we can automate our CI/CD workflows directly from GitHub. Fantastic!
Let's discuss some of the components of GitHub Actions
Workflows
Workflows are an automated process that runs one or more jobs when triggered by a particular event or after a scheduled period of time. Workflows are stored in a YML file in the .github/workflows directory. A good example of a workflow is one that deploys the application to production after commits are pushed to the production branch.
Events
Events are simply activities that trigger a workflow. i.e creating a pull request, pushing commits, and creating issues.
Jobs
Jobs are groups of steps in a workflow that executes on a particular runner. All jobs run in parallel by default, but jobs can be configured to depend on another job.
Actions
Actions are custom apps that are used to run complex and repetitive tasks. i.e setting up your build environment (e.g Node.js, Python, Go), and pulling your repository from GitHub. e.t.c.
Runner
A runner is a server that executes workflows when triggered. Runners can be servers provided by GitHub or a custom server that can be set up with GitHub actions.
Creating the CI workflow
For the continuous integration workflow, we'll create the following checks:
Linting check to ensure our code is consistent with the rules we defined in our eslint and prettier configuration files.
Checks to ensure our application builds without failing.
Unit and Integration Tests to validate that our application works as expected.
At the root of the project create a new file test.yml in a .github/workflows directory and add the code below
# .github/workflows/test.yml

name: Test
on:
  push: # A push to any branch triggers the workflow
jobs:
  verify-code-integrity-and-run-tests:
    runs-on: ubuntu-latest # runs the job on the latest version of Ubuntu (Linux)
    steps:
      - uses: actions/checkout@v3 # pull the git repository and set it as the current working directory
      - uses: actions/setup-node@v3 # set ups Node.js in the runner
        with:
          node-version: "16"
      - name: Install Dependencies
        run: yarn install
      - name: Run Linting Checks
        run: yarn lint
      - name: Build Application
        run: yarn build
      - name: Run Tests
        run: yarn test
As stated earlier, workflows in GitHub actions are stored in YML files in the .github/workflows directory.
Let's take a closer look at this workflow file:
As you might have guessed, the
namefield stores the name of the workflow.onfield specifies which actions trigger the workflow in this case it's a push event.jobsfield stores all the jobs that'll run for this workflow. Each job has a unique id,verify-code-integrity-and-run-testsis the job id of the only job in this workflow. The value specified forruns-ondetermines what type of machine the job will run on. i.e Ubuntu (Linux), macOS, Windows.stepsstores a collection of individual shell commands or actions that'll run consecutively.usesspecifies that a step runs a particular action.actions/checkout@v3pulls our repository from GitHub and sets it as the current working directory whileactions/setup-node@v3sets up Node and below it is thewithfield that specifies options that modify the behavior of an action, in this case,node-versionsets the version of Node to install. Below the actions are a series of shell scripts,namespecifies the name of a step andruntells the runner what shell command to execute.
When commits are pushed to the repository the Test workflow runs automatically and the verify-code-integrity-and-run-tests job executes each of the steps declared in this job, for this job to pass each step must run successfully.
Commit the changes you've made and push them to your GitHub repo.
git add .github/workflows/
git commit -m "Add test workflow"
git push origin start
Now let's visit GitHub and navigate to the Actions page, there's a table that shows all workflows, we should see our Test workflow running.

After a couple of minutes, the workflow should have been completed

So far we've been able to set up a workflow that runs checks on our code when commits are pushed to the repo.
Adding a branch protection rule
Let's add a branch protection rule to the main branch to ensure the Test workflow passes before a feature branch can merge with the main branch. Navigate to the settings page of your GitHub repo and select the Branches tab.
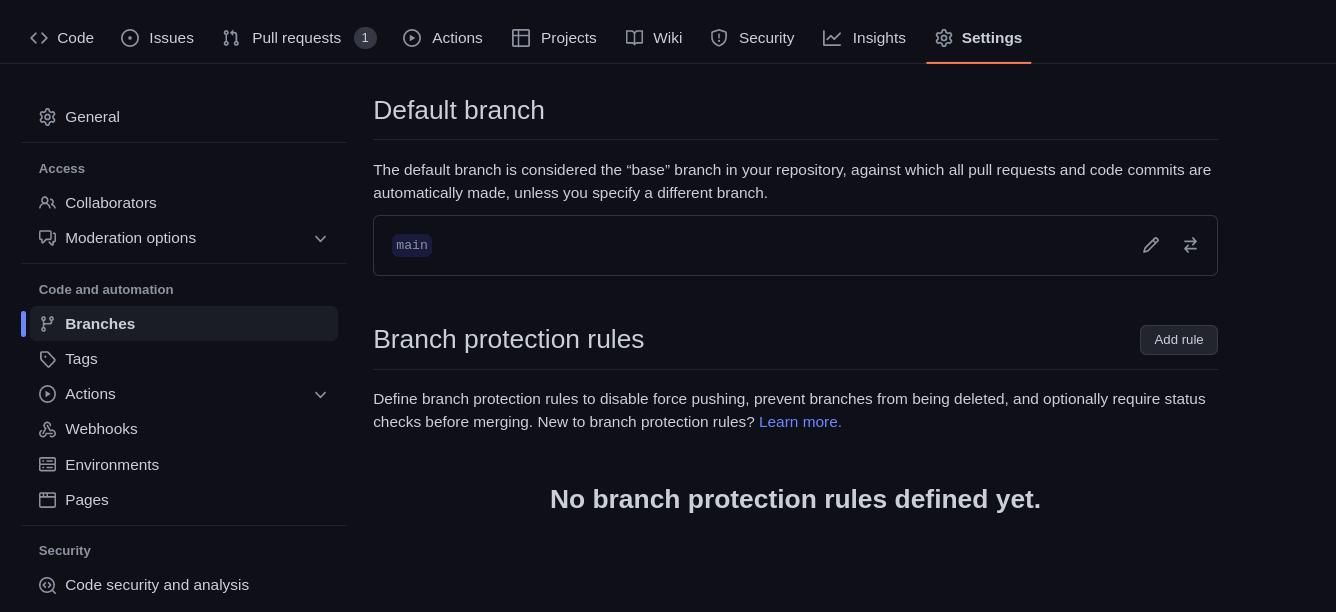
Next, click on the Add rule button to create a new branch protection rule to ensure certain criteria are met before changes are merged.
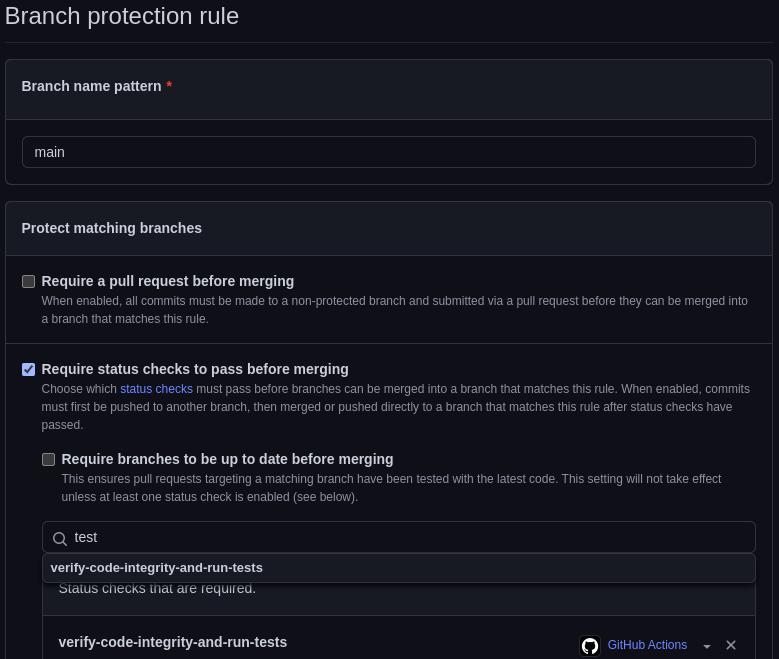
The Require status checks to pass before merging ensures our Test workflow pass before changes can be merged to the main branch.
Finally, click the create button to add the rule.
CI in Action
To see how all this fits together we'll create a pull request to the main branch. Let's make changes to the app's header component.
Switch to a new branch
git checkout -b update-header
Open src/components/Header.jsx and modify the code to look like the one below
import React from "react";

export default function Header() {
  return (
    <div className="fixed z-[999] inset-0 h-[70px] flex py-[14px] shadow-[rgba(0_0_0_0.068)] bg-white shadow-md">
      <div className="text-[1.3rem] my-auto ml-[22px] font-bold">
        Where am I in the world?
      </div>
    </div>
  );
}
Next, commit the change and push it to the repo.
 git add .
 git commit -m "Update header"
 git push origin update-header
Create a new pull request to the main branch from the update-header branch. The Test workflow might still be running by the time you created the pull request but after some time it should look like this
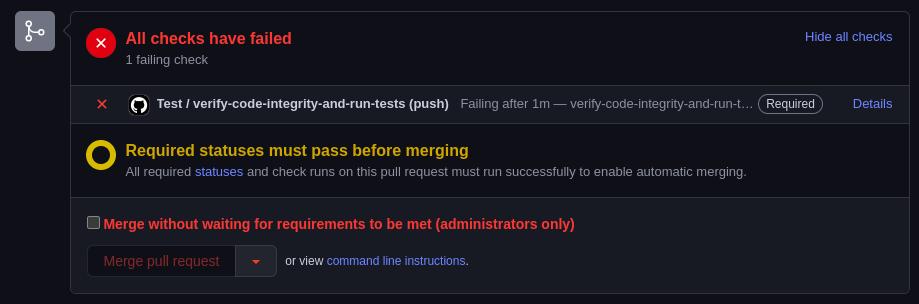
The status check is failing because the unit test for the header component is failing. When we modified the header we didn't update the unit test to reflect the new change. Open the test for the header component in src/components/__tests__/Header.test.jsx and modify the code to look like the one below
import { render, screen } from "@testing-library/react";
import Header from "../Header";

describe("Header Component", () => {
  test("Renders without crashing", () => {
    render(<Header />);
  });

  test("Displays correct header text", () => {
    render(<Header />);
    expect(screen.queryByText("Where am I in the world?")).toBeInTheDocument();
  });
});
Commit the changes and push them to the repo.
 git add .
 git commit -m "Fix failing test"
 git push origin update-header
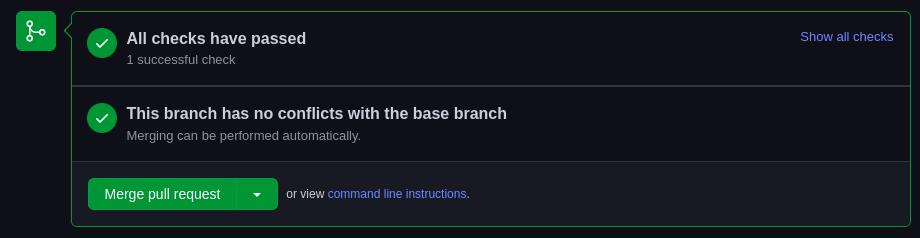
When we pushed our changes the Test workflow ran again but this time it passed. Now we can merge with the main branch.

Our continuous integration workflow is now complete.
We've been able to ensure that
The
Testworkflow runs after every push to the repoAny pull request or push to the
mainbranch requires that theTestworkflow must pass.
Setting up Continuous Deployment
We've been able to set up a CI workflow now let's get to the final part of the pipeline which is continuous deployment. We need to deploy our application after we push changes to the repo and then use Netlify to deploy to the web.
Create a site on Netlify
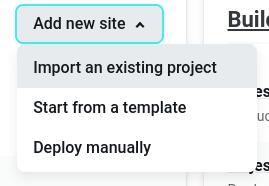
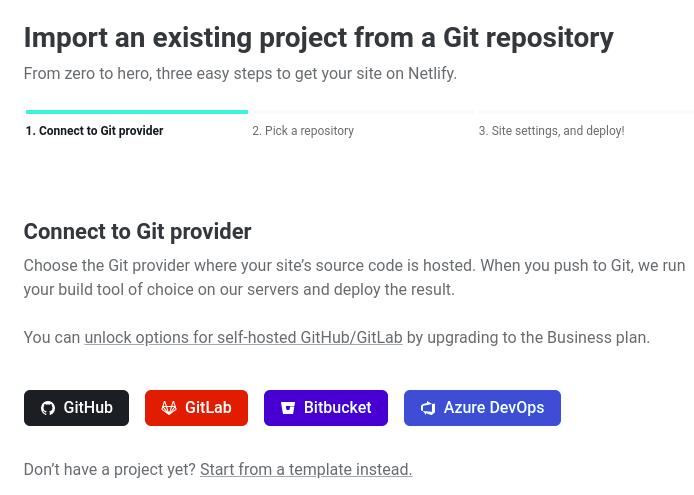
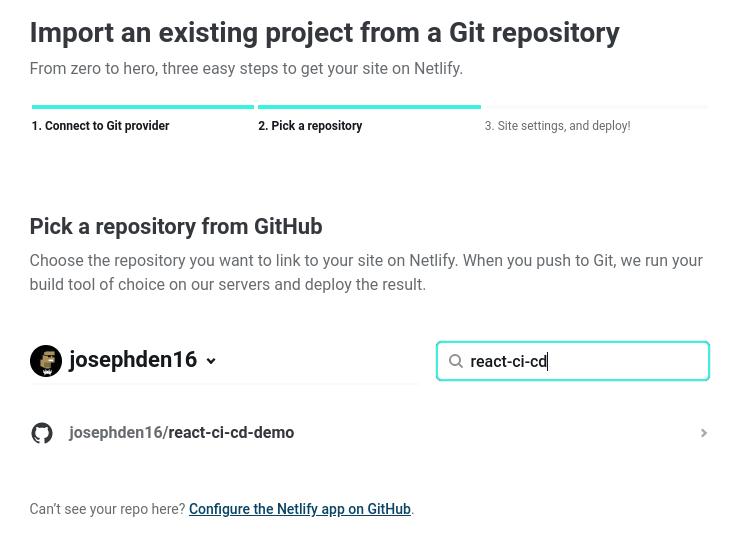
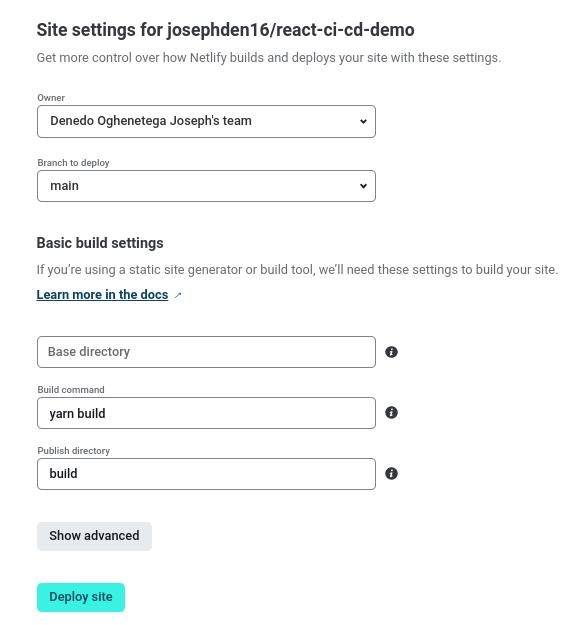
Go to your Netlify dashboard and create a new site
Step One: Create a new site from an existing project
**Step Two: Import project from GitHub **
Step Three: Select the GitHub repository
Step Four: Deploy the site
After a couple of minutes, the application deployment will be complete and we can access it on the web.
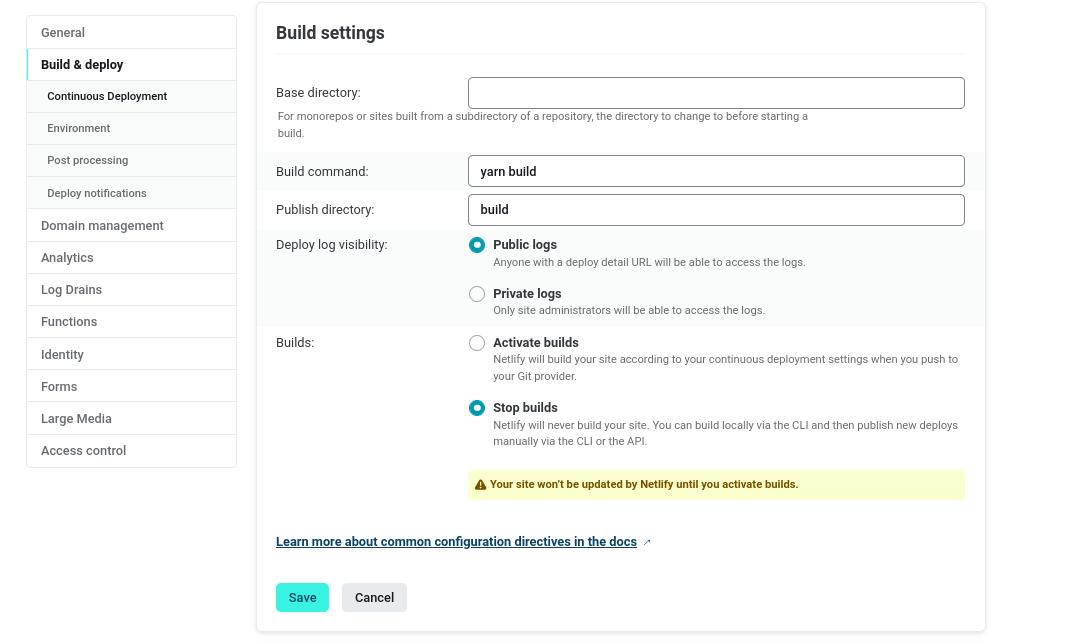
The way Netlify is set up with GitHub every push triggers a deployment but we want to have more control over our deployment.
To disable it navigate to the site settings and update yours to look like this
Creating the production deployment workflow
Let's add the workflow deploying to production.
First switch to a new branch
git checkout -b deploy-production
In the .github/workflows directory create a new file deploy-production.yml and add the code below
name: Run Tests, Build and Deploy to Production
on:
  push:
    branches:
      - "main" # A push to the main branch triggers a production deployment
jobs:
  verify-and-deploy:
    runs-on: ubuntu-latest # runs the job on the latest version of Ubuntu (Linux)
    steps:
      - uses: actions/checkout@v3 # pull the git repository and set it as the current working directory
      - uses: actions/setup-node@v3 # set ups Node.js in the runner
        with:
          node-version: "16"
      - name: Install Dependencies
        run: yarn install
      - name: Make production build
        run: yarn build
      - name: Deploy to Netlify
        uses: nwtgck/actions-netlify@v1.2.3
        with:
          production-deploy: true
          production-branch: main
          publish-dir: "./build"
          github-token: ${{ secrets.GITHUB_TOKEN }} # token generated by GitHub for authentication purposes
          deploy-message: "Deploy from GitHub Actions"
          enable-pull-request-comment: false
          enable-commit-comment: true
          overwrites-pull-request-comment: true
        env:
          NETLIFY_AUTH_TOKEN: ${{ secrets.NETLIFY_AUTH_TOKEN }} # Netlify Auth Token stored in the secrets of the GitHub Repo
          NETLIFY_SITE_ID: ${{ secrets.NETLIFY_SITE_ID }} # Netlify Site ID stored in the secrets of the GitHub Repo
The workflow runs tests, builds the application, and deploys it to production, for it to be successful the verify-and-deploy job must pass.
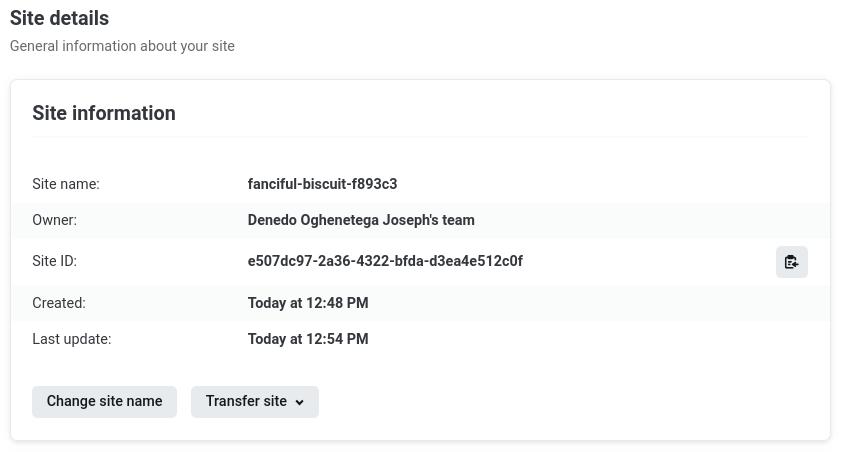
In this workflow, we're making use of three environment variables and only the GITHUB_TOKEN is predefined, we need to get the values for the NETLIFY_AUTH_TOKEN and NETLIFY_SITE_ID environment variables from the Netlify site settings.
The value for NETLIFY_SITE_ID is the Site ID
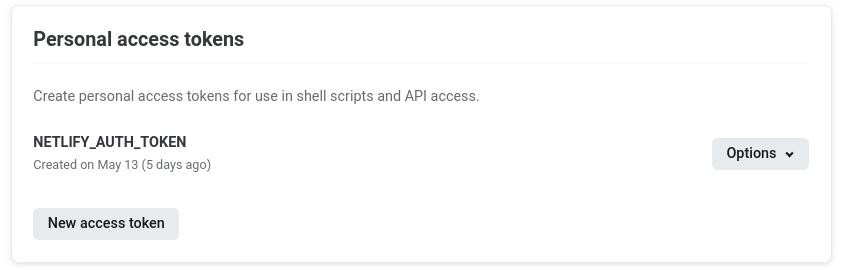
While the NETLIFY_AUTH_TOKEN can be created here
To set the environment variables, navigate to the settings page of your repository and select Actions from the Secrets dropdown.
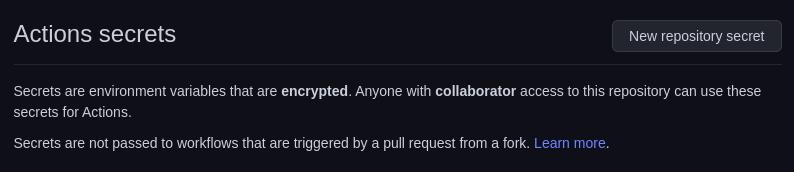
Click on the New repository secret button and add the NETLIFY_SITE_ID and NETLIFY_AUTH_TOKEN environment variables.
Let's push the changes we've made to our local repository and make a pull request
git add .github/workflows/
git commit -m "Add production deployment workflow"
git push origin deploy-production
The checks passed so we have no issues merging our changes to the main branch
Go to the Actions page in your repository you should see two workflows after merging the pull request.

The new workflow for deploying to production runs automatically after pushing changes to the main branch.
Deploy Previews
It's nice to have previews of the application when working on a feature before pushing it to the main branch.
Let's add a workflow for deploying a preview of the application when a push or pull request is made to any branch except main
Switch to a new branch
git checkout -b deploy-preview
Create a new file deploy-preview.yml in the .github/workflows directory and add the code below
name: Build and Deploy Preview
on:
  push:
    branches-ignore:
      - main
  pull_request:
    branches-ignore:
      - main # A push or pull request to all branches except main triggers the workflow
jobs:
  build-and-deploy:
    runs-on: ubuntu-latest
    steps:
      - uses: actions/checkout@v3
      - uses: actions/setup-node@v3
        with:
          node-version: "16"
      - name: Install Dependencies
        run: yarn install
      - name: Make production build
        run: yarn build
      - name: Deploy to Netlify
        uses: nwtgck/actions-netlify@v1.2.3
        with:
          publish-dir: "./build"
          production-deploy: false
          github-token: ${{ secrets.GITHUB_TOKEN }} # token generated by GitHub for authentication purposes
          deploy-message: "Deploy from GitHub Actions"
          enable-pull-request-comment: true
          enable-commit-comment: true
          overwrites-pull-request-comment: true

        env:
          NETLIFY_AUTH_TOKEN: ${{ secrets.NETLIFY_AUTH_TOKEN }} # Netlify Auth Token stored in the secrets of the GitHub Repo
          NETLIFY_SITE_ID: ${{ secrets.NETLIFY_SITE_ID }} # Netlify Site ID stored in the secrets of the GitHub Repo
Commit the changes, push and create a pull request.
git add .github/workflows
git commit -m "Add deploy preview workflow"
git push origin deploy-preview
After a couple of minutes, a new comment is added with a message containing a link to preview the deployment.
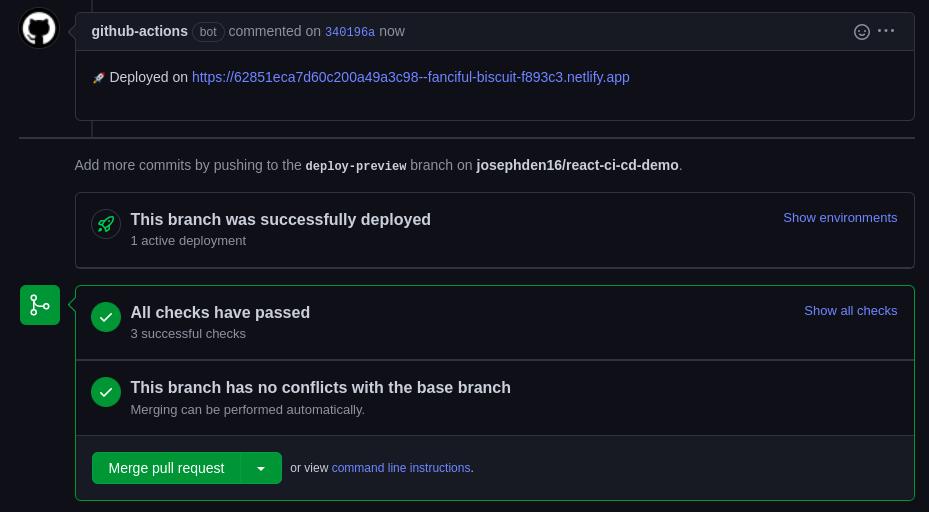
Everything works as expected so we can merge the pull request.
Congratulations 🎉 You've been able to set up a CI/CD pipeline for a frontend application.
Conclusion
In this article, we discussed what CI/CD is, the benefits and how to set up a CI/CD pipeline for a frontend application. What was covered in this article is a basic overview of what a CI/CD process looks like, every application is different and has its own complexities and requirements that'll shape how the CI/CD pipeline is implemented.
